


Installing PVC pipes for plumbing or other DIY projects can seem daunting at first, but with the right tools, materials, and a bit of patience, you can complete the job successfully. PVC (polyvinyl chloride) is a durable, affordable, and easy-to-use material commonly used for plumbing, irrigation, and drainage systems. This guide will take you through the process of installing PVC pipes, ensuring your DIY project goes smoothly.
1. Gather Your Materials and Tools
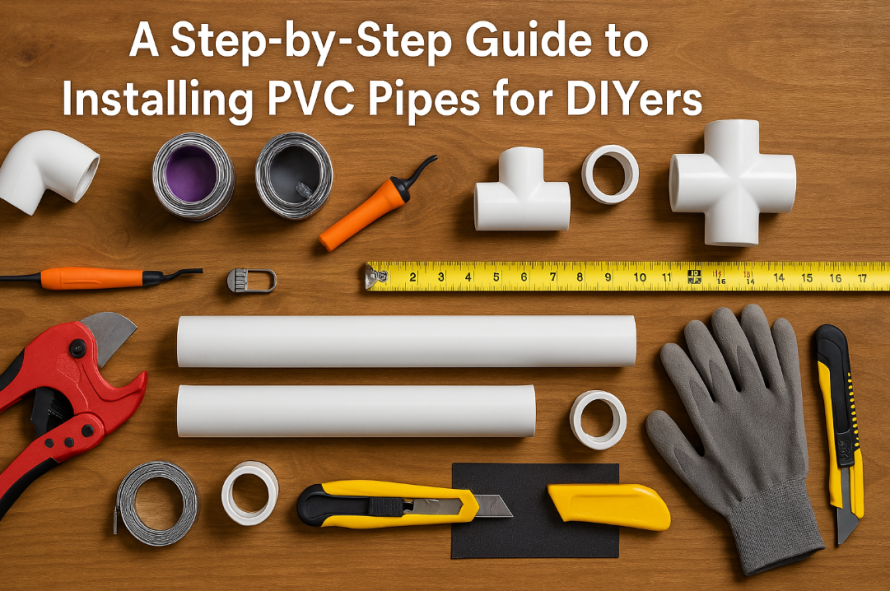
Before you begin, make sure you have all the necessary materials and tools. Heres a list to get you started:
- PVC Pipes: Choose the correct size and type of pipe based on your project needs. Standard sizes range from ½ inch to 4 inches in diameter.
- PVC Pipe Cutter or Hacksaw: A pipe cutter will provide a cleaner, straighter cut, but a hacksaw can work as well.
- PVC Primer and Cement: These adhesives are essential for creating strong, leak-free connections between the pipes and fittings.
- PVC Pipe Fittings: Youll need elbows, tees, couplings, or other fittings depending on your specific project requirements. Lesso pipe fittings are popular for their quality and reliability.
- Measuring Tape: Accurate measurements are crucial for cutting the pipes to the correct lengths.
- Deburring Tool or Sandpaper: To smooth out rough edges after cutting the pipes.
- Gloves and Safety Glasses: Protect yourself from sharp edges and chemicals during the installation process.
2. Plan and Measure the Layout
The first step in the installation process is to plan and measure where your PVC pipes will go. Whether youre setting up a plumbing system or installing irrigation pipes, a clear plan will help avoid costly mistakes.
- Sketch the Layout: Draw a simple diagram of your project to visualize the pipe runs, fittings, and connections. Include the locations of joints, elbows, or any other special fittings.
- Take Accurate Measurements: Use a measuring tape to ensure that each pipe section is the correct length. Remember that when cutting pipes, its always better to measure twice and cut once to ensure accuracy.
3. Cut the PVC Pipes
Once your measurements are ready, its time to cut the pipes. Make sure you use a pipe cutter or hacksaw designed for PVC. Heres how to do it:
- Mark the Cut: Use a pencil or marker to mark the pipe where you plan to cut. Make sure your measurements are precise to avoid mistakes.
- Cut the Pipe: If youre using a pipe cutter, simply clamp the pipe in place and rotate the cutter around the pipe until it cuts through. With a hacksaw, hold the pipe steady and saw through it slowly and carefully. Try to make the cut as straight as possible.
- Smooth the Edges: After cutting, use a deburring tool or sandpaper to smooth out any rough edges. This step is important to avoid damaging the fittings and to ensure a secure connection.
4. Dry Fit the Pipes and Fittings
Before applying any adhesives, its a good idea to dry fit all your pipes and fittings. This allows you to double-check the layout and make sure everything fits properly.
- Assemble the Pieces: Put together the pipes and fittings as per your layout plan. Ensure the ends of the pipes fit snugly into the fittings.
- Adjust if Necessary: If anything doesnt fit correctly, make adjustments now rather than after the adhesive has been applied.
5. Clean the Pipe Ends and Fittings
For a strong and secure bond, its essential to clean the pipe ends and fittings before applying any primer or cement.
- Clean the Pipe: Use a clean cloth or rag to wipe away any dirt, grease, or moisture from the ends of the pipes.
- Clean the Fittings: Do the same for the inside of the fittings, making sure there is no dust or debris that could interfere with the bonding process.
6. Apply PVC Primer
The next step is to apply PVC primer, which helps prepare the pipe and fitting surfaces for bonding. It also cleans the surfaces and softens them to create a stronger bond.
- Apply the Primer: Using a brush or applicator, apply a generous amount of primer to both the pipe and the fitting. Be sure to coat the entire surface where the pipe and fitting will meet.
- Allow it to Dry: Wait for the primer to dry for a few seconds. It doesnt need to be completely dry, but it should not be wet when you apply the cement.
7. Apply PVC Cement
Now that the primer is dry, its time to apply the PVC cement. This is the adhesive that will permanently bond the pipe and fitting together.
- Apply the Cement: Using the same brush or applicator, apply a generous layer of PVC cement to both the pipe and the fitting. Be sure to cover the entire area where the two parts will join.
- Assemble the Parts Quickly: Once the cement is applied, quickly insert the pipe into the fitting, twisting slightly to ensure an even coat of cement. Hold the pieces together for about 30 seconds to allow the bond to set.
- Wipe Away Excess Cement: Use a clean rag to wipe away any excess cement that may have squeezed out during the connection process.
8. Let the Cement Cure
After assembling all the pieces, allow the PVC cement to cure. It typically takes about 2-4 hours for the bond to set, though its best to wait 24 hours before testing the system to ensure the adhesive has fully cured.
9. Test the System
Once the cement has cured, test your installation to ensure everything is functioning correctly. For plumbing applications, turn on the water supply and check for leaks. For irrigation or drainage systems, test the flow of water to ensure there are no blockages.
Conclusion
Installing PVC pipes doesnt have to be intimidating. With careful planning, the right tools, and a step-by-step approach, even DIYers can successfully complete their projects. Whether youre tackling a small plumbing task or setting up an irrigation system, following these steps will ensure that your installation is secure and leak-free. Dont forget to choose quality materials for the best results.